
Transplanting
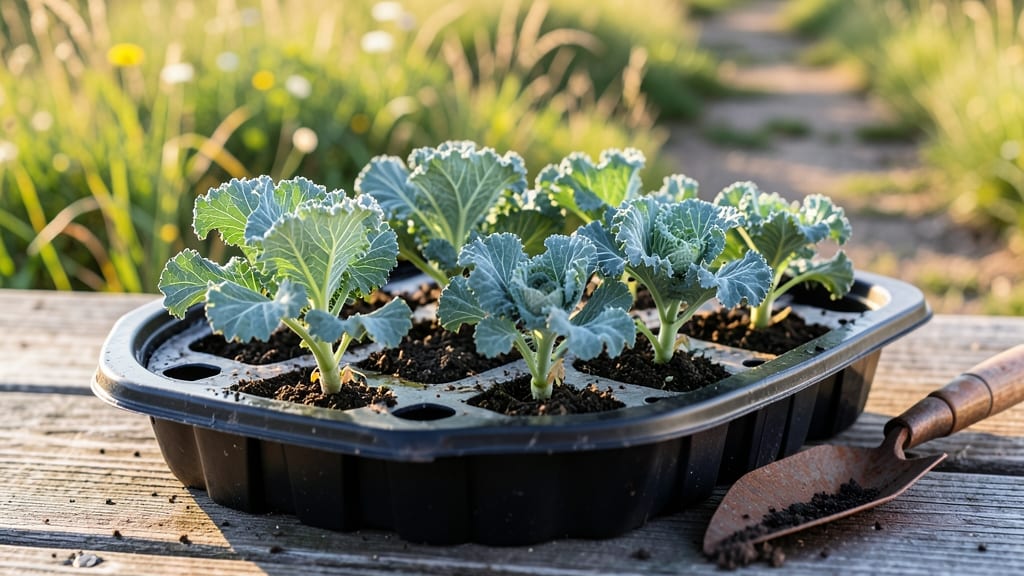
Browse these kale seedlings pictures to spot the perfect moment—when those tiny sprouts pack enough strength to handle transplanting, setting you up for a thriving harvest. not just survive. The first true leaves signal readiness, but there’s more to it than just counting days.
Healthy seedlings have vibrant green leaves and strong stems, while weak ones look leggy or yellowed. I’ve found that using a good seed-starting mix and keeping them in bright light prevents those common pitfalls.
A simple grow light or sunny windowsill works wonders if you’re starting indoors before the last frost.
By the time they reach 4-6 inches tall with at least four leaves, they’re ready for transplanting. The roots should fill the container, and the seedlings should stand up straight on their own. This is when you know you’ve got plants strong enough to handle the garden’s challenges.
Whether you’re transplanting into the ground or containers, the key is to harden them off first—just a few days of outdoor exposure makes all the difference. I’ve never lost a batch of kale seedlings since I started following these stages, and neither will you.
📚 In This Guide
- What you need
- Instructions
- Tips and common mistakes
- Wrapping up and next steps
What you need
- ● Seeds: Organic kale seeds (choose a variety like Lacinato, Red Russian, or Curly Kale—about 10-20 seeds depending on your container size).
- ● Seed Starting Trays or Pots: Biodegradable peat pots (3-4 inch diameter, 10-20 units) or
- ● Plastic cell trays (28-72 cell count, 1-2 trays).
- ● Seed Starting Mix: High-quality, sterile seedling mix (avoid garden soil—it’s too dense!). 1-2 cubic feet should suffice for most setups.
- ● Grow Lights or Sunny Window: LED grow lights (full-spectrum, 12-16 hours/day) or
- ● A south-facing window with 6+ hours of direct sunlight.
- ● Misting Bottle or Spray Nozzle: For gentle watering (16-32 oz capacity).
- ○ Humidity Dome or Plastic Wrap: To retain moisture (optional but helpful for the first week!).
- ● Small Hand Trowel: For transplanting seedlings (3-4 inch blade).
- ● Labels & Markers: To track seed varieties and planting dates.
- ● Heating Mat: Keeps soil 70-75°F for faster germination (great for cool climates!).
- ● Fertilizer: Water-soluble, low-nitrogen seedling fertilizer (e.g., 5-10-5 ratio) for the first feeding.
- ● Fan: A small oscillating fan to strengthen seedlings (place 2-3 inches away for 2-3 hours/day).
- ● Camera or Smartphone: For documenting growth stages—because kale seedlings pictures make the process even more fun! 📸
Instructions for identifying healthy kale seedlings ready for transplant
Here’s how to recognize each growth stage so you know exactly when to move seedlings outdoors.
Examine the Germination Stage (Days 5-10)
After sowing, your kale seeds will sprout tiny cotyledons—those first two round leaves that look like miniature cabbage leaves. These appear 5-10 days after planting, depending on warmth. The key is waiting until both cotyledons fully unfurl before doing anything else. At this point, seedlings are fragile, so avoid disturbing them unless you’re checking soil moisture.
Keep the soil consistently moist but not soggy—press your finger ½ inch deep into the soil. If it feels dry, water gently with a spray bottle. Overwatering now can cause damping-off, where seedlings collapse suddenly. If you see black stems or yellowing at the base, act fast by removing affected plants and improving airflow.
Identify True Leaves (Days 10-14)
The real milestone arrives when first true leaves emerge—these are smaller, jagged-edged leaves that look like miniature kale. Unlike cotyledons, true leaves indicate the plant has established its full photosynthetic system. Count them: you’ll want 3-4 true leaves before transplanting, as this signals enough root development to handle outdoor conditions.
At this stage, seedlings should be 2-3 inches tall with sturdy stems. If they’re leggy (long and thin with leaves spaced far apart), they need more light. Move them within 4 inches of a grow light or to a sunnier window. Leggy seedlings struggle to support themselves and may flop over after transplanting.
Assess Root and Stem Health (Days 14-21)
Gently grasp the base of a seedling to check root strength. Healthy roots will have white, fibrous growth that fills the root ball. If roots are sparse or mushy, the seedling isn’t ready—keep it indoors for another week. Strong roots mean the plant can absorb water and nutrients efficiently once outside.
Inspect stems for color and thickness. Kale seedlings should have deep green stems with no yellowing or soft spots. If stems feel hollow or weak, the plant may have been overwatered. At this point, you’ll also notice small side shoots forming at the base—this is a good sign of vigor. Avoid fertilizing now; seedlings are sensitive to excess nutrients at this stage.
Prepare for Transplant (Days 21-28)
Transplant when seedlings are 4-6 inches tall with 5-6 true leaves, and outdoor temperatures stay above 50°F at night. Harden off seedlings by placing them outside in partial shade for 2-3 hours daily, gradually increasing exposure over 7-10 days. Watch for wilting—if leaves droop but perk up after watering, they’re adjusting fine.
Before moving to the garden, trim any yellow or damaged leaves with clean scissors. This reduces stress and helps the plant focus energy on root establishment. Plant in full sun to partial shade, spacing seedlings 12-18 inches apart. Water deeply at transplanting to settle soil around roots, and mulch with 1-2 inches of organic mulch to retain moisture.
Tips & tricks for identifying healthy kale seedlings
Here’s how to avoid common pitfalls and ensure your kale seedlings thrive from seed to transplant.
Timing is Everything: During the germination stage (days 5-10), resist the urge to check seedlings constantly—they’re fragile. Instead, focus on maintaining consistent moisture by pressing your finger ½ inch deep into the soil daily. If the soil feels dry, use a spray bottle for gentle watering. Overwatering here can cause damping-off, so let the top layer dry slightly between waterings.
Light Matters: Leggy seedlings between days 10-14 mean your plants need more light. Move them within 4 inches of a grow light or to a south-facing window. I’ve learned this the hard way—leggy seedlings flop over after transplanting because their stems can’t support their own weight. Rotate trays daily for even growth, especially if using artificial light.
Root Check: When assessing root health (days 14-21), gently grasp the base of a seedling to test strength. Healthy roots should feel firm and white with fibrous growth. If roots are sparse or mushy, the seedling needs more time indoors. I’ve saved many seedlings by keeping them indoors an extra week rather than risking transplanting too early.
Transplant Readiness: Kale seedlings are ready for transplant when they’re 4-6 inches tall with 5-6 true leaves and nighttime temperatures stay above 50°F. Before moving them outdoors, harden off seedlings by gradually increasing their time in partial shade over 7-10 days. This slow acclimation prevents shock and wilting—something I’ve seen happen when people rush this step.
Pro Tips for Kale Seedlings Pictures
- Here’s how to avoid common pitfalls and ensure your kale seedlings thrive from seed to transplant.
- Timing is Everything: During the germination stage (days 5-10), resist the urge to check seedlings constantly—they’re fragile.
- Light Matters: Leggy seedlings between days 10-14 mean your plants need more light.
Frequently asked questions
Got questions about kale seedlings? You’re not alone!
Whether you're troubleshooting, timing your transplant, or just curious about what healthy seedlings look like, we’ve got you covered. Here are some of the most common questions—and answers—to help you grow confidently.
How do I know if my kale seedlings are ready to transplant?
Kale seedlings are ready when they have 3-4 true leaves (not just the initial seed leaves) and are about 2-3 inches tall. Their stems should be sturdy, and they should look vibrant, not leggy or yellow. Avoid transplanting in extreme heat or cold—aim for cooler days (50–75°F) for best results.
How long does it take for kale seedlings to grow from seed to transplant?
Most kale seedlings take 4–6 weeks to reach the ideal transplant stage, depending on temperature and light. If grown indoors under grow lights, they may mature faster (around 3–4 weeks). Pro tip: Use a heat mat if your home is chilly to speed up germination and early growth!
What should I do if my kale seedlings look leggy or weak?
Leggy seedlings happen when they don’t get enough light. To fix it:
- Move them closer to a sunny window or under grow lights (12–16 hours/day).
- Thin them if overcrowded—give each seedling 1–2 inches of space.
- Use a reflective surface (like aluminum foil) under trays to bounce light upward.
Can I transplant kale seedlings in hot weather?
Kale hates heat—it bolts (goes to seed) quickly in temperatures above 80°F (27°C). For hot climates:
- Transplant in early morning or late afternoon to avoid stress.
- Use shade cloth for the first week to protect them.
- Consider fall planting (6–8 weeks before first frost) for ideal growth.
What’s a good alternative if my kale seedlings fail?
Don’t stress—kale isn’t your only green option! Try these fast-growing, cold-tolerant alternatives:
- Spinach: Ready in 4–6 weeks, thrives in cool weather.
- Arugula: Peppery and quick (3–4 weeks to harvest).
- Swiss chard: Hardy and productive, great for succession planting.
- Collard greens: Similar to kale but more heat-tolerant.
Wrapping up and next steps
Growing kale seedlings is a rewarding journey, and recognizing each stage—from sprouts to sturdy transplants—makes the process even more exciting! 🌱 Whether you're a seasoned gardener or just starting, your hard work will soon pay off with vibrant, healthy kale ready for transplanting.
Now that you’ve mastered the stages, take the next step: plan your transplanting schedule based on your local climate and give those seedlings the love they deserve in their new home.
- Pro tip: Snap a few photos of your seedlings at each stage—it’s a great way to track progress and share your green thumb success with fellow gardeners! 📸