
Propagation
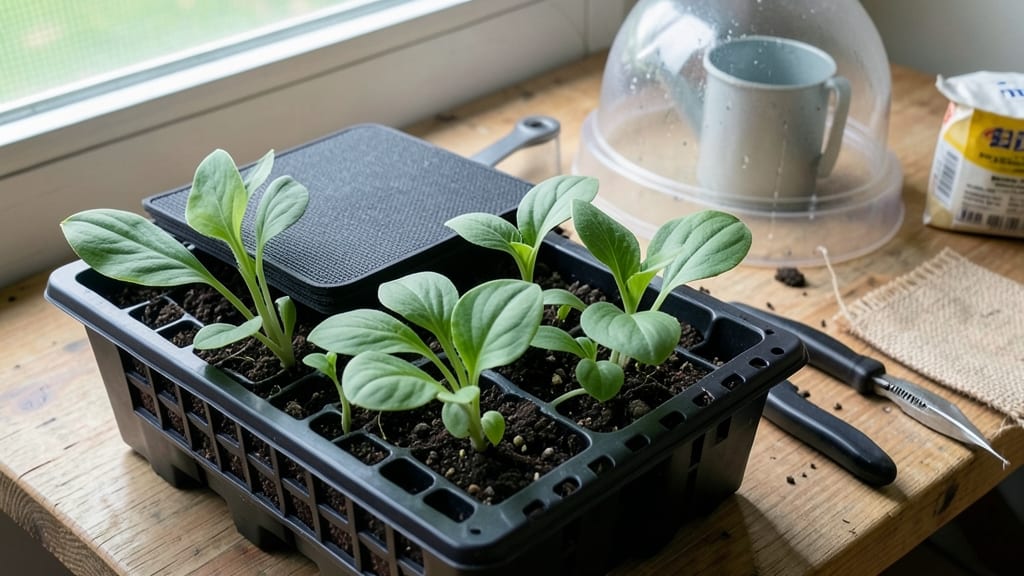
Mastering hosta seed germination feels like watching paint dry—until you try this humidity dome hack that slashes sprouting time from months to weeks. 🌱 I’ve struggled with hosta seeds before, watching them take forever or never break through. through at all, but this method changed everything.
The secret isn’t just patience; it’s creating the right conditions to mimic hostas’ natural forest-floor environment.
You’ll need just a few simple supplies: a clear plastic dome or bag, a shallow tray, moistened seed-starting mix, and—most importantly—patience (though not as much as before).
Hostas are famously slow to germinate, often taking 6-12 weeks under ideal conditions, but the dome keeps moisture and warmth consistent, which is half the battle. The other half? Avoiding common pitfalls like overwatering or letting the mix dry out.
Once you’ve got your setup, you’ll watch those tiny seeds push through the soil in 2-4 weeks instead of months, with strong, sturdy seedlings ready for transplanting.
The results are shockingly lush for something that starts as a speck of seed, and the trick works for rare varieties that aren’t available as divisions. No more waiting years for a unique hosta—just a dome, a little care, and a whole garden’s worth of potential.
This method works for both beginners and seasoned gardeners, though it’s especially useful if you’re growing rare hostas from seed or just want to experiment with new varieties.
The dome trick isn’t just about speed—it’s about reliability, turning a hit-or-miss process into a predictable one. Ready to give it a try?
📚 In This Guide
- What you need
- Instructions
- Tips and common mistakes
- Wrapping up and next steps
What you need
- ● Hosta seeds: Fresh, high-quality seeds (10–50, depending on your goals). Pro tip: Buy from reputable suppliers for best results! 🌡️
- ● Seed-starting mix: 1–2 cups of sterile, well-draining potting mix (look for a peat-based or coco coir blend). Avoid garden soil—it’s too dense!
- ● Seed trays or small pots: 4–6" trays or 2–3" pots with drainage holes (1–2 units). Clear plastic or biodegradable options work great.
- ● Humidity dome or DIY cover: Store-bought: A clear plastic clamshell or propagation dome (1 unit).
- ● DIY: A plastic food container with a lid (e.g., a 16oz deli container) or a plastic wrap + toothpicks to create a tent.
- ● Spray bottle: 8–12 oz with a fine mist nozzle (1 unit). Pro tip: Distilled water prevents algae buildup! 💡
- ○ Heat mat (optional but helpful): A 10"x20" heat mat (70–85°F range) to speed up germination. Place under trays for faster sprouts! ⏱️
- ● Trowel or spoon: Small handheld tool for gently pressing seeds into soil (1 unit).
- ● Labels & markers: To track seed varieties (1–2 units).
- ● Grow lights or sunny windowsill: A LED grow light (12–16 hrs/day) or a south-facing window with indirect light.
- ● Perforated tray: To elevate trays and improve airflow (1 unit).
- ○ Ventilation fan (optional): A small USB fan to circulate air and prevent mold (1 unit).
Step-by-Step instructions for hostas from seed
Here's the method I've used to reliably coax hosta seedlings from tiny seeds—no more wasted packets!
🌱 Step 1: Prepare Seeds and Planting Medium
Hostas have tiny, dust-like seeds that need perfect conditions to germinate. Start by filling a shallow tray with 2 inches of moistened seed-starting mix. I like to mix in a little perlite (about 10% by volume) to improve drainage—hosta seeds rot quickly if kept too wet. Smooth the surface without pressing down, creating a fine, even layer where seeds can settle.
Scatter seeds as evenly as possible, but don't worry about depth—hosta seeds need light to germinate. A gentle shake of the packet over the tray works best. I find using a toothpick helps space them out slightly. Cover the tray with clear plastic wrap or a humidity dome, securing it tightly to create a greenhouse effect.
💧 Step 2: Maintain Ideal Moisture and Temperature
The key to hosta germination is consistent moisture without waterlogging. Place the tray in a warm spot (around 65-75°F) where it won't be disturbed. I keep mine on top of my refrigerator—stable temperature, out of direct light. Check daily but only mist the plastic wrap with water; condensation inside should keep the seeds moist.
Never let the soil dry out completely, but avoid standing water. You'll know it's right when the plastic stays slightly fogged but not dripping. Germination typically takes 2-4 weeks, though some seeds may take longer. Patience is critical—don't be tempted to peek too often or disturb the setup.
☀️ Step 3: Introduce Light Gradually
Once seedlings emerge, remove the humidity dome immediately to prevent fungal growth. Place them under bright, indirect light for the first week—direct sun will scorch the delicate sprouts. I use a grow light on a low setting about 6 inches above the tray, giving them 12 hours of light daily.
Watch for the first true leaves (the second set after the initial seed leaves) to appear. These will be smaller and more hosta-like. This is when you can start rotating the tray a quarter turn daily to prevent leggy growth. If seedlings look pale or stretched, they need more light—move them closer or increase light duration.
🌿 Step 4: Thin and Transplant Seedlings
When seedlings have 2-3 sets of true leaves (about 6-8 weeks after sowing), it's time to thin. Use small scissors to snip unwanted seedlings at soil level, leaving the strongest one in each spot. I always keep a few extras in case of transplant shock.
Gently transplant the remaining seedlings into 2-inch pots filled with a mix of potting soil and perlite. Handle by the leaves, never the stems, to avoid damage. Water lightly after transplanting and place in partial shade for a week to help them adjust. This gradual transition reduces stress and improves survival rates.
⏰ Step 5: Acclimate Before Outdoor Planting
Hostas are hardy but need careful introduction to outdoor conditions. About 2 weeks before your last frost date, start hardening off seedlings by placing them outside in a sheltered spot for 1-2 hours daily. Gradually increase exposure over 10-14 days, ending with full sun conditions.
Plant outdoors after all danger of frost has passed, spacing them 12-18 inches apart in partial to full shade. Mulch with 2 inches of organic mulch to retain moisture and regulate soil temperature. The first year, they'll grow slowly, but with patience, you'll have mature hostas in just a few seasons.
Tips & tricks for perfect hosta seed germination
These subtle adjustments make all the difference between wasted seed packets and thriving hosta seedlings.
Humidity Dome Technique: The plastic wrap creates a greenhouse effect that maintains the critical 75°F temperature range without overwatering. I've found that securing it tightly with rubber bands prevents gaps where moisture escapes. If condensation forms on the inside but doesn't drip, you've got the perfect balance—too much fog means excess moisture, while dry plastic indicates under-moisture.
Light Management Secret: During Step 3, when introducing light, I recommend using a white fluorescent bulb instead of grow lights for the first week. These emit less heat that could stress delicate seedlings while still providing the bright, indirect light they need. Position it 6 inches above and adjust height based on leaf color—pale yellow means more light, deep green means perfect intensity.
Thinning Strategy: In Step 4, when thinning seedlings, I use a pair of clean, sharp scissors to avoid pulling—this prevents disturbing the roots of nearby plants. I also recommend thinning gradually over 2-3 days rather than all at once. This gives the remaining seedlings time to adjust to their new space without shock. The strongest seedlings will have vibrant green leaves and sturdy stems.
Hardening Off Hack: For Step 5, I create a DIY hardening-off station by placing seedlings on a windowsill with a sheer curtain for partial shade. Each day, I gradually move them to sunnier spots while monitoring for wilting. This mimics natural conditions better than abrupt outdoor exposure. Remember, the 1-2 hour daily increments should feel like a gentle introduction, not a shock treatment.
Pro Tips for Hosta Seed Germination
- These subtle adjustments make all the difference between wasted seed packets and thriving hosta seedlings.
- Humidity Dome Technique: The plastic wrap creates a greenhouse effect that maintains the critical 75°F temperature range without overwatering.
- Light Management Secret: During Step 3, when introducing light, I recommend using a white fluorescent bulb instead of grow lights for the first week.
Frequently asked questions
Got questions about germinating hosta seeds? You’re not alone—this process can feel tricky! Below, we’ve rounded up the most common concerns and straightforward answers to help you succeed.
How long does it take for hosta seeds to germinate?
Patience is key! Hosta seeds typically take 2–6 weeks to sprout, depending on temperature, humidity, and seed freshness. A humidity dome keeps conditions ideal, but avoid overwatering—consistent moisture (not soggy soil) speeds things up. Pro tip: Label your trays to track planting dates!
What’s the best temperature for germinating hosta seeds?
Hostas thrive in 65–75°F (18–24°C) during germination. Use a seedling heat mat if your home runs cooler, or place trays near a sunny window (but avoid direct heat sources). A humidity dome traps warmth naturally, but monitor for condensation—too much can cause mold.
Why aren’t my hosta seeds sprouting?
Common culprits: old seeds (hosta seeds lose viability after 1–2 years), poor moisture (soil should stay damp but not waterlogged), or low light. Try scarifying seeds (lightly nicking the shell) or soaking them overnight in warm water to break dormancy. If using a humidity dome, ensure it’s sealed but ventilated slightly to prevent rot.
Can I use a plastic bag instead of a store-bought humidity dome?
A clear plastic bag with a few air holes works perfectly—just secure it loosely over the tray to trap humidity. Check daily for condensation; if the bag fogs up, lift it to air out the seeds for 10–15 minutes. Bonus: Place a damp paper towel inside the bag to boost moisture levels naturally.
How do I transplant seedlings once they sprout?
Wait until seedlings have 2–3 true leaves (not just the initial seed leaves) and are at least 2 inches tall. Gently remove them from the dome, harden off for 3–5 days by reducing humidity daily, then transplant to individual pots with well-draining soil. Warning: Hostas are slow growers—avoid transplanting too early or they’ll struggle.
Wrapping up and next steps
Mastering hosta seed germination with a humidity dome is totally doable—just follow the right steps! 🌱 With patience, consistency, and the right conditions, you’ll soon be watching those tiny sprouts break through the soil. Now’s the time to celebrate your progress and trust the process!
Ready to take the next step? Once your seedlings are strong enough, transplant them into individual pots or directly into your garden bed. Keep an eye on their growth, and soon you’ll be enjoying lush, thriving hostas that’ll make your green space the envy of the neighborhood. Happy gardening!